Settings
Open Settings from the main toolbar to control where your cleaned-up files are saved and how the program behaves. The Settings window is divided into tabs: General, Microsoft Office, PDF, Email, Notifications, Watched Folder, Limits, and Security.
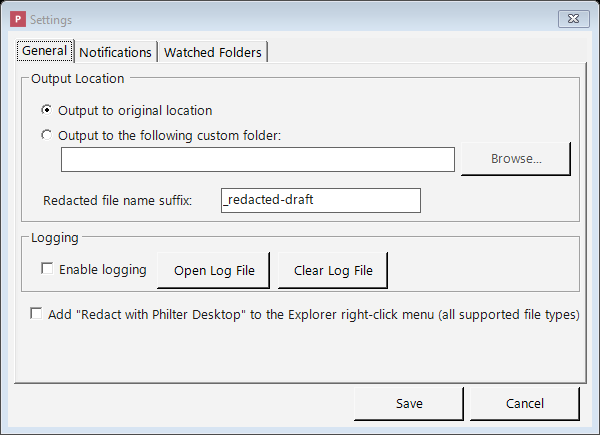
The Settings window, where you choose the output location and tune how Philter Desktop behaves.
General tab
The General tab is where you set the output location (where cleaned-up files go), turn logging on or off, switch on the Windows Explorer right-click menu, and choose whether Philter Desktop starts automatically when you sign in to Windows.
Where your cleaned-up files are saved (Output location)
You choose where Philter Desktop puts the cleaned-up copies it creates:
- Original location: the cleaned-up copy is saved in the same folder as the document it came from.
- Custom folder: every cleaned-up copy is saved into one folder that you pick, no matter where the original came from.
Either way, the cleaned-up file is always a new copy: your original document is never changed.
Duplicate file names are never overwritten. If a cleaned-up copy would have the same name as a file
already in the output folder — for example, two documents called invoice.pdf from different folders,
both sent to one custom output folder — Philter Desktop adds a number so nothing is clobbered:
invoice_redacted-draft.pdf, then invoice_redacted-draft (2).pdf, then (3), and so on. (This also
means redacting the same document again produces a new numbered copy rather than replacing the previous
one.) When you use Redact with Preview and save with the Save dialog, Windows asks before
overwriting instead.
You can also set the Redacted file name suffix, the label that's added to the end of each
cleaned-up file's name (just before the file extension). By default it is _redacted-draft, so
report.docx becomes report_redacted-draft.docx.
The default says "draft" because automatic redaction can miss things: the file still needs your review before you share it and should never be assumed safe just because the computer produced it. Change the suffix to match your own naming habits. (If you clear the box and leave it empty, it resets to the default.)
Logging
Turning on logging tells Philter Desktop to keep a running record of what it does in a log file, useful if something goes wrong and you (or technical support) need to look into it. The Open Log File button shows you the log. Logging is off by default.
Use Clear Log File to permanently delete that log. The log records application activity for troubleshooting (errors and the names of files that were processed); it does not contain the detected or redacted text from your documents. Since the file names themselves can be sensitive, you can wipe it whenever you like. A new log starts the next time something is logged.
Once the log reaches about 5 MB it's rolled over to a backup (a few older backups are kept and the oldest is discarded), so it never fills up your disk.
Explorer right-click menu
This option lets you redact files straight from a Windows folder, without opening Philter Desktop first.
Turn on Add "Redact with Philter Desktop" to the Explorer right-click menu. Once it's on, you can
go to any folder, select one or more .pdf, .docx, .txt, .rtf, .xlsx, .csv, .eml, or
.msg files, right-click them, and choose Redact with Philter Desktop. A small window appears listing the files you picked and
letting you choose the policy and context to use (and whether to highlight redactions in Word
documents). When you click Redact, the files are handed to Philter Desktop's
redaction queue and processed just like any other document. Philter Desktop
starts up on its own if it isn't already running. If you select several files at once, you get a single
window for the whole group.
A few practical notes:
- Switching this option on adds the right-click command for your user account; switching it off removes it again. The change happens immediately; there's no need to click a separate Save button.
- Uninstalling Philter Desktop always cleans up the right-click command for you.
- The option is off by default.
- If you're a technical user who'd rather automate redaction without the pop-up window, you can use the command line directly.
Start automatically at sign-in
Turn on Start Philter Desktop at sign-in to have Philter Desktop launch on its own each time you sign in to Windows. It starts minimized to the system tray (the small icons near the clock) and keeps working quietly in the background, which is what makes watched folders useful even when you haven't opened the window yourself. Leave it off if you'd rather start the program by hand. This setting is saved with the others when you click Save.
Microsoft Office tab
Office documents carry information that has nothing to do with the visible text, and a "redacted" file that still includes it defeats the purpose. The Microsoft Office tab lets you strip these hidden channels and control header/footer redaction. All options below are on by default:
- Remove document metadata (author, company, title, keywords, custom fields). Clears the document's
properties so the redacted copy doesn't name who wrote it or where it came from. For Word, this also
anonymizes the reviewer names on any comments you keep — each author becomes a neutral label such
as "Reviewer 1" (kept consistent so a back-and-forth still reads as separate people) — and removes the
stored list of reviewer identities. Applies to both Word (
.docx) and Excel (.xlsx). - Remove reviewer comments. Deletes all comments (and the reviewer names attached to them). When this is off, comments are kept but their text is still redacted, and their author names are anonymized if Remove document metadata is on (above). (Word only.)
- Accept and remove tracked changes (revisions). Accepts every insertion and deletion and removes the revision history, so no record of who changed what (or what the earlier text was) remains. (Word only.)
- Remove hidden text. Deletes text that was marked hidden, which wouldn't show on screen but is still present in the file. (Word only.)
- Redact text in page headers and footers. Scans the running header and footer — the lines that
repeat at the top and bottom of every page (for example "Confidential — John Doe") — and redacts
detected sensitive information there, just like the body. Only text is redacted: images, logos,
page numbers, and other non-text content in a header or footer are left as they are. Legitimate text
such as a printed date is only removed if your policy targets it. Turn this off if a header/footer
contains text you don't want scanned. Applies to both Word (
.docx) and Excel (.xlsx). - Redact charts. Scans embedded charts and redacts detected sensitive information in their titles
and labels and in the cached data values — the copy of the plotted series and category values
a chart keeps inside the file, which would otherwise remain even after the source cells are redacted.
Redacting a cached value can change how a chart looks (a label or bar may show the replacement text),
so review charts in the redacted copy. Charts are only scanned as text through your policy, so a
sensitive value a chart is built from is removed only when the policy detects it. Applies to both
Word (
.docx) and Excel (.xlsx). - Redact cached formula values (Excel only). An Excel formula keeps a copy of its last computed
result inside the file. That copy can duplicate sensitive information from a cell you're redacting
(for example a formula
=A2that pointed at a redacted address), and it stays in the file as plain text until Excel recalculates. When on, a formula whose cached result holds detected sensitive information becomes a static redacted value, and the remaining formula caches are cleared with the workbook set to recalculate when it's next opened in Excel. One side effect: a program that reads the file without recalculating (i.e. not Excel) sees empty formula results until it recalculates — turn this off if that matters for how the file is consumed, and be aware a formula's cached copy of a redacted value may then remain. Verification checks formula caches either way. - Redact pivot table cache (Excel only). A pivot table keeps a denormalized copy of its source data inside the file — the pivot cache — so redacting the sheet cells alone leaves an intact copy of the sensitive values. When on, the cached values in the pivot cache (its definition and records) and in the pivot table are scanned and redacted, and the cache is set to refresh from the (redacted) source when the file is opened in Excel. On by default. Redacting the cache changes what the pivot shows until Excel refreshes it. Verification checks the pivot cache either way.
- Remove embedded objects Philter Desktop can't inspect (Word and Excel). A document can embed another file (Insert → Object) — an Excel workbook, a Word document, or a legacy/other-program object. An embedded Word or Excel document is redacted in place (its own content is scanned like any other document); but an object Philter Desktop can't read — a legacy OLE object or another program's file — can't be inspected, and would otherwise ship with its original content. When on, those un-inspectable objects are removed. On by default. When off, they are kept and verification warns that their content wasn't inspected — so you can review them yourself.
Leave these on unless you have a specific reason to keep that information. They affect only what's stored in the redacted copy; your original document is never changed, and you should still review the finished file.
PDF tab
Some PDFs are scanned: each page is a picture of a document rather than real, selectable text. Such a file has no text for Philter Desktop to read, so on its own it would have nothing to detect and redact. The PDF tab controls whether Philter Desktop uses OCR (optical character recognition) to read those scanned pages.
- Read scanned (image-only) PDF pages with on-device OCR (on by default). When on, Philter Desktop recognizes the text on scanned pages entirely on your own computer (nothing is uploaded), so the PII on them can be found and redacted like any other document. Pages that already contain real text are read normally; OCR is used only where it's needed. A page that has both real text and a large scanned image (for example, a scan beneath a typed letterhead) is read both ways, so nothing slips through.
OCR is best-effort: it is slower than reading normal text, and it can miss low-quality scans, unusual fonts, and handwriting. As always, review the redacted file before sharing it, and the Modify Redaction tools let you cover anything OCR didn't catch.
Advanced settings
The Advanced… button (available when OCR is on) exposes two thresholds that decide when a page is read with OCR. Most people should never change these. The defaults suit virtually all documents, and the wrong value can make redaction slower or cause pages to be read the wrong way. Change them only if you have a specific problem and understand the trade-off.
- Treat a page as scanned when its text covers under … % (default 1%). If the real text on a page fills less than this share of the page, the page is treated as scanned and read with OCR. Raise it to OCR more pages (slower, but less likely to miss a mostly-scanned page); lower it to OCR fewer.
- Also OCR a text page when images cover at least … % (default 50%). Even when a page has real text, if pictures cover at least this share of it, Philter Desktop also OCRs the page to catch any text inside those pictures. Lower it to OCR more pages that contain large images.
- Maximum pages to OCR in one PDF (default 200). A safety limit: if a single PDF needs OCR on more pages than this, Philter Desktop stops with an error instead of partly processing it, so a document is never saved looking finished while sensitive text on the un-OCR'd pages survives. Raise it to handle larger scanned documents, or set it to 0 for no limit.
To return to normal behavior, set these back to 1%, 50%, and 200.
- Redact recurring images (experimental) (off by default). When on, redacting a PDF also blacks out images that repeat across its pages — the hallmark of a logo, watermark, or stamp — wherever they appear, without drawing a fixed region. It is experimental: it only covers raster (picture) images (not logos drawn as vector lines), may miss some or cover more than intended (any image that legitimately repeats is redacted too), and it leaves full-page backgrounds alone so it doesn't black out whole pages. Review the redacted PDF when this is on. See Redacting PDF documents.
Email tab
A redacted email keeps more than the message you can see. Email files carry technical headers that
can identify the sender and how the message travelled: the originating IP address, the mail
program that sent it, and the server-by-server delivery trail (the Received, X-…, and ARC-…
headers, Message-ID, and similar). A "redacted" email that still includes these can leak who sent it
and from where.
- Remove technical email headers from redacted email (on by default). When on, those identifying
headers are stripped from the redacted
.eml. The visible fields (Subject, From, To, Cc, the body, and the Date) are kept (and their PII is still redacted as usual); only the hidden routing/technical headers are removed. (The send Date can be removed separately with the option below.) - Remove Bcc and other identity headers (Reply-To, Sender, Resent) (on by default). These headers
carry recipient or sender addresses that aren't part of the visible From / To / Cc fields, so
they wouldn't otherwise be redacted. Bcc is the most important: it names blind-copy recipients and
is carried over when an Outlook
.msgis converted, so without this it would survive into the redacted email. When on, these headers are removed entirely (not just scanned): both their value and the fact that they were present are gone. Turn it off only if you specifically need to keep them — and be aware that when it is off, these headers are kept exactly as they are. Unlike From / To / Cc, they are not scanned for PII, so any addresses in them — including Bcc recipients — remain in the redacted email. If you disable this, review those headers yourself before sharing. - Remove the Date header from redacted email (off by default). When on, the Date header (the message's send time) is dropped outright, so the send time is removed no matter how it is formatted — this does not rely on the policy recognizing a date. It is off by default because the send date is usually wanted and isn't personally identifying on its own; turn it on if your policy needs to remove temporal identifiers. (A timestamp can also appear inside the delivery trail — leave the technical-header option above on to strip that.)
- Remove attachments from redacted email (off by default). When on, every attachment is
deleted entirely from the redacted email — not redacted. Philter Desktop does not open, inspect, or
redact attachment content in any case; this option removes the attached files outright, including their
filenames (which can themselves reveal information, e.g.
john_smith_ssn.pdf). It is off by default because it discards content you may need; turn it on when an email's attachments could carry sensitive information that must not ship in the redacted copy. The message body is still redacted as usual.- Also remove inline images (off by default; available only when the option above is on).
Inline images are pictures embedded in the message body — logos, signatures, pasted screenshots
— referenced by the HTML with a
cid:link. Philter Desktop does not inspect or redact image content, so sensitive information shown only inside an image would otherwise pass through. When on, inline images are deleted and their references in the body are neutralized. Leave it off if you want to keep images such as a corporate logo — but note the caveat below. Whenever a redacted email still contains attachments or inline images, verification adds a warning that their content wasn't inspected, so an un-inspected image is never left silently.
- Also remove inline images (off by default; available only when the option above is on).
Inline images are pictures embedded in the message body — logos, signatures, pasted screenshots
— referenced by the HTML with a
Leave the first two on unless you specifically need to preserve the original headers (for example, for an e-discovery chain-of-custody requirement).
Notifications tab
The Notifications tab controls the small pop-up messages (sometimes called "balloon" or "toast" notifications) that appear near the Windows clock when a document finishes redacting.
- Show a tray notification when a document finishes redacting: turn this on or off. It is on by default. Click Save to apply your choice.
A few things worth knowing about these notifications:
- They appear only when you're not already looking at Philter Desktop: when its window is hidden in the system tray or minimized. While the window is open in front of you, Philter Desktop never interrupts you with a pop-up, because you can already see the results in the queue.
- When several documents finish at once (for example, files dropped into a watched folder), they're combined into a single notification rather than one per file.
- Clicking the notification opens the folder containing the finished files.
- Turning this option off stops these pop-ups entirely. It does not affect anything else: your documents are still redacted, and the queue still shows each document's status.
This setting is the master switch for all completion notifications. Watched folders have their own per-folder notification checkbox, but that only has an effect while this master switch is on: if you turn notifications off here, no pop-ups appear for watched folders either, regardless of each folder's setting.
Watched Folder tab
The Watched Folder tab lets you set up folders that Philter Desktop watches automatically: any document dropped into a watched folder is redacted on its own, without you adding it to the queue by hand. So that watching keeps working even when the window is closed, the program can run quietly from the system tray; to have it available automatically, turn on Start Philter Desktop at sign-in on the General tab. This feature has its own detailed page; see Watched Folders.
It also has a "Watched-folder files to redact at once" setting. Leave this at 1 (the default) unless you have a specific reason to change it: redacting several files at once uses more memory and processor, so a higher number should be chosen only with careful consideration. See Processing more than one file at a time for guidance.
Limits tab
The Limits tab holds safeguards that keep very large or unusual inputs from using up all of your computer's memory.
- Skip input files larger than … MB (default 500). Redacting a file loads it into memory, so an extremely large file can be slow or fail. Any file larger than this is not redacted, however it was added: on the automatic paths (watched folders and the command line) it is skipped and noted in the log, and a file you add yourself (drag-and-drop, Add Files, or Redact Spreadsheet) is marked failed in the queue with a note — rather than being loaded whole and risking running your computer out of memory. Set it to 0 for no limit. Separately, when you add files yourself, Philter Desktop also shows a proceed/cancel heads-up above 50 MB for large (but still under-the-limit) files, since those can be slow.
- Maximum time for one detection pattern (seconds) (default 5, adjustable from 5 to 15). Detection patterns can come from a policy, including your own custom-identifier regular expressions, which may also arrive in a policy someone shared with you. A badly written or overly complex pattern can take an extremely long time on certain text, which would otherwise make redaction appear to hang. This limit aborts any single pattern that runs longer than the chosen number of seconds: that document reports an error (so you know to fix the pattern) instead of freezing. The default of 5 seconds is far more than a normal pattern ever needs; raise it only if a genuinely huge document needs more time.
Security tab: protecting your stored information
This tab controls how the information Philter Desktop stores on your computer is kept safe.
What Philter Desktop stores, and why it's protected
To do its job, Philter Desktop keeps some information on your computer: your policies, your contexts, your settings, the list of documents in your queue, and the redaction history (the record of what was redacted, which, through the Modify Redaction feature, can include the actual sensitive text that was found). All of this lives in a small private file in your personal Windows profile.
Because that history can contain personal information, Philter Desktop encrypts the file at rest so it can't be read by anyone who simply opens it: it's stored in a locked, unreadable form whenever it's sitting on your disk. The "key" that unlocks it is created automatically the first time you run the program and is locked to your Windows account on that specific computer, using a protection feature built into Windows itself. By default you don't have to enter any password, but the file can only be opened by you, signed in to your own account, on your own machine; a copy taken to another computer would be useless. If you're upgrading from an older version, your existing data is locked down automatically the first time the new version runs.
This protects your data from someone reading it off the disk directly, or from a stolen copy of the file. It does not protect against other software that's already running under your own Windows account; for that, use the passphrase option described next.
Adding a passphrase for stronger protection
By default, your stored information is tied to your Windows account. For an extra layer of protection (one that even other software running as you can't get past), the Security tab lets you require a passphrase (a password) before the program will open:
- Check Require a passphrase to open the database and choose a passphrase (at least 8 characters, typed twice to confirm). From then on, Philter Desktop will ask you for it every time it starts.
- Use Change Passphrase… to change it later (you'll confirm the current one first).
- Uncheck the box to remove passphrase protection and go back to the standard Windows-account protection.
The passphrase itself is never saved anywhere. The program only keeps enough scrambled information to check that what you type is correct; it never stores the passphrase in a form anyone could read. Turning the passphrase on or off, or changing it, takes effect instantly and never requires re-processing your data.
Please choose your passphrase carefully and store it somewhere safe. If you forget it, there is no way to recover your stored information. Also note that, because the program must be unlocked before it can do anything, you'll be asked for the passphrase even when Philter Desktop starts automatically at sign-in (which keeps your watched folders working).
Verifying redactions automatically
The Verify each redaction by re-scanning the output for PII that may remain option (on by default) makes Philter Desktop double-check its own work: after each document is redacted, it re-opens the finished file and runs the detector again, looking for anything the policy might have missed. If something is found, you're warned and shown what and where. It runs entirely on your device. This applies to every way Philter Desktop redacts — the queue, watched folders (the warning appears in the folder's activity log and notification), and the command line (it's printed as a warning) — so an automated redaction is never silently left unchecked.
Two scan choices sit underneath it (they apply to the automatic check):
- Scan with a broad policy — every detector on (default, recommended): looks for kinds of information your policy didn't cover (the missed-PII case that matters most). It catches more, so it may flag things you deliberately left unredacted (review those); the document's own replacement values aren't reported.
- Scan with the same policy used to redact (limited): only confirms that policy took effect — it can't find a kind of information the policy never looked for.
Leave verification on, or turn it off if you prefer to verify manually. You can always right-click a finished document and choose Verify Redaction, which lets you pick With same policy or With broad policy for that one document. See Checking the result for anything missed for details.
Clearing your saved redaction history
If you want to wipe the stored history of what's been redacted, use File → Clear Redaction History… from the main window. This erases the saved versions and redaction lists (including any sensitive text they captured) and removes the completed documents from the queue list. It does not delete the cleaned-up files you've already saved to disk; those remain wherever you saved them, and any documents still being processed are left in place.